Issue
Issues are a core feature for systematically managing problems or improvements found in feedback. This document covers all issue management features, from issue creation to category management and various view modes.
Issue Overview
Role of Issues
Issues are used for the following purposes:
- Problem tracking: Systematically manage bugs, errors, performance issues, etc.
- Feature request management: Structure user requests and reflect them in development plans
- Identifying improvements: Identify improvement points through feedback analysis
Issue Status
Each issue has the following status:
| Status | Description | When Used |
|---|---|---|
| New | Newly registered | Initial issue creation |
| On Review | Under review | When assignee starts review |
| In Progress | In progress | During actual work |
| Resolved | Resolved | Problem solved and completed |
| On Hold | Temporarily on hold | Waiting for additional info or deferred |
Creating/Editing/Deleting Issues
Issue Creation Methods
Issues can be created in two ways.
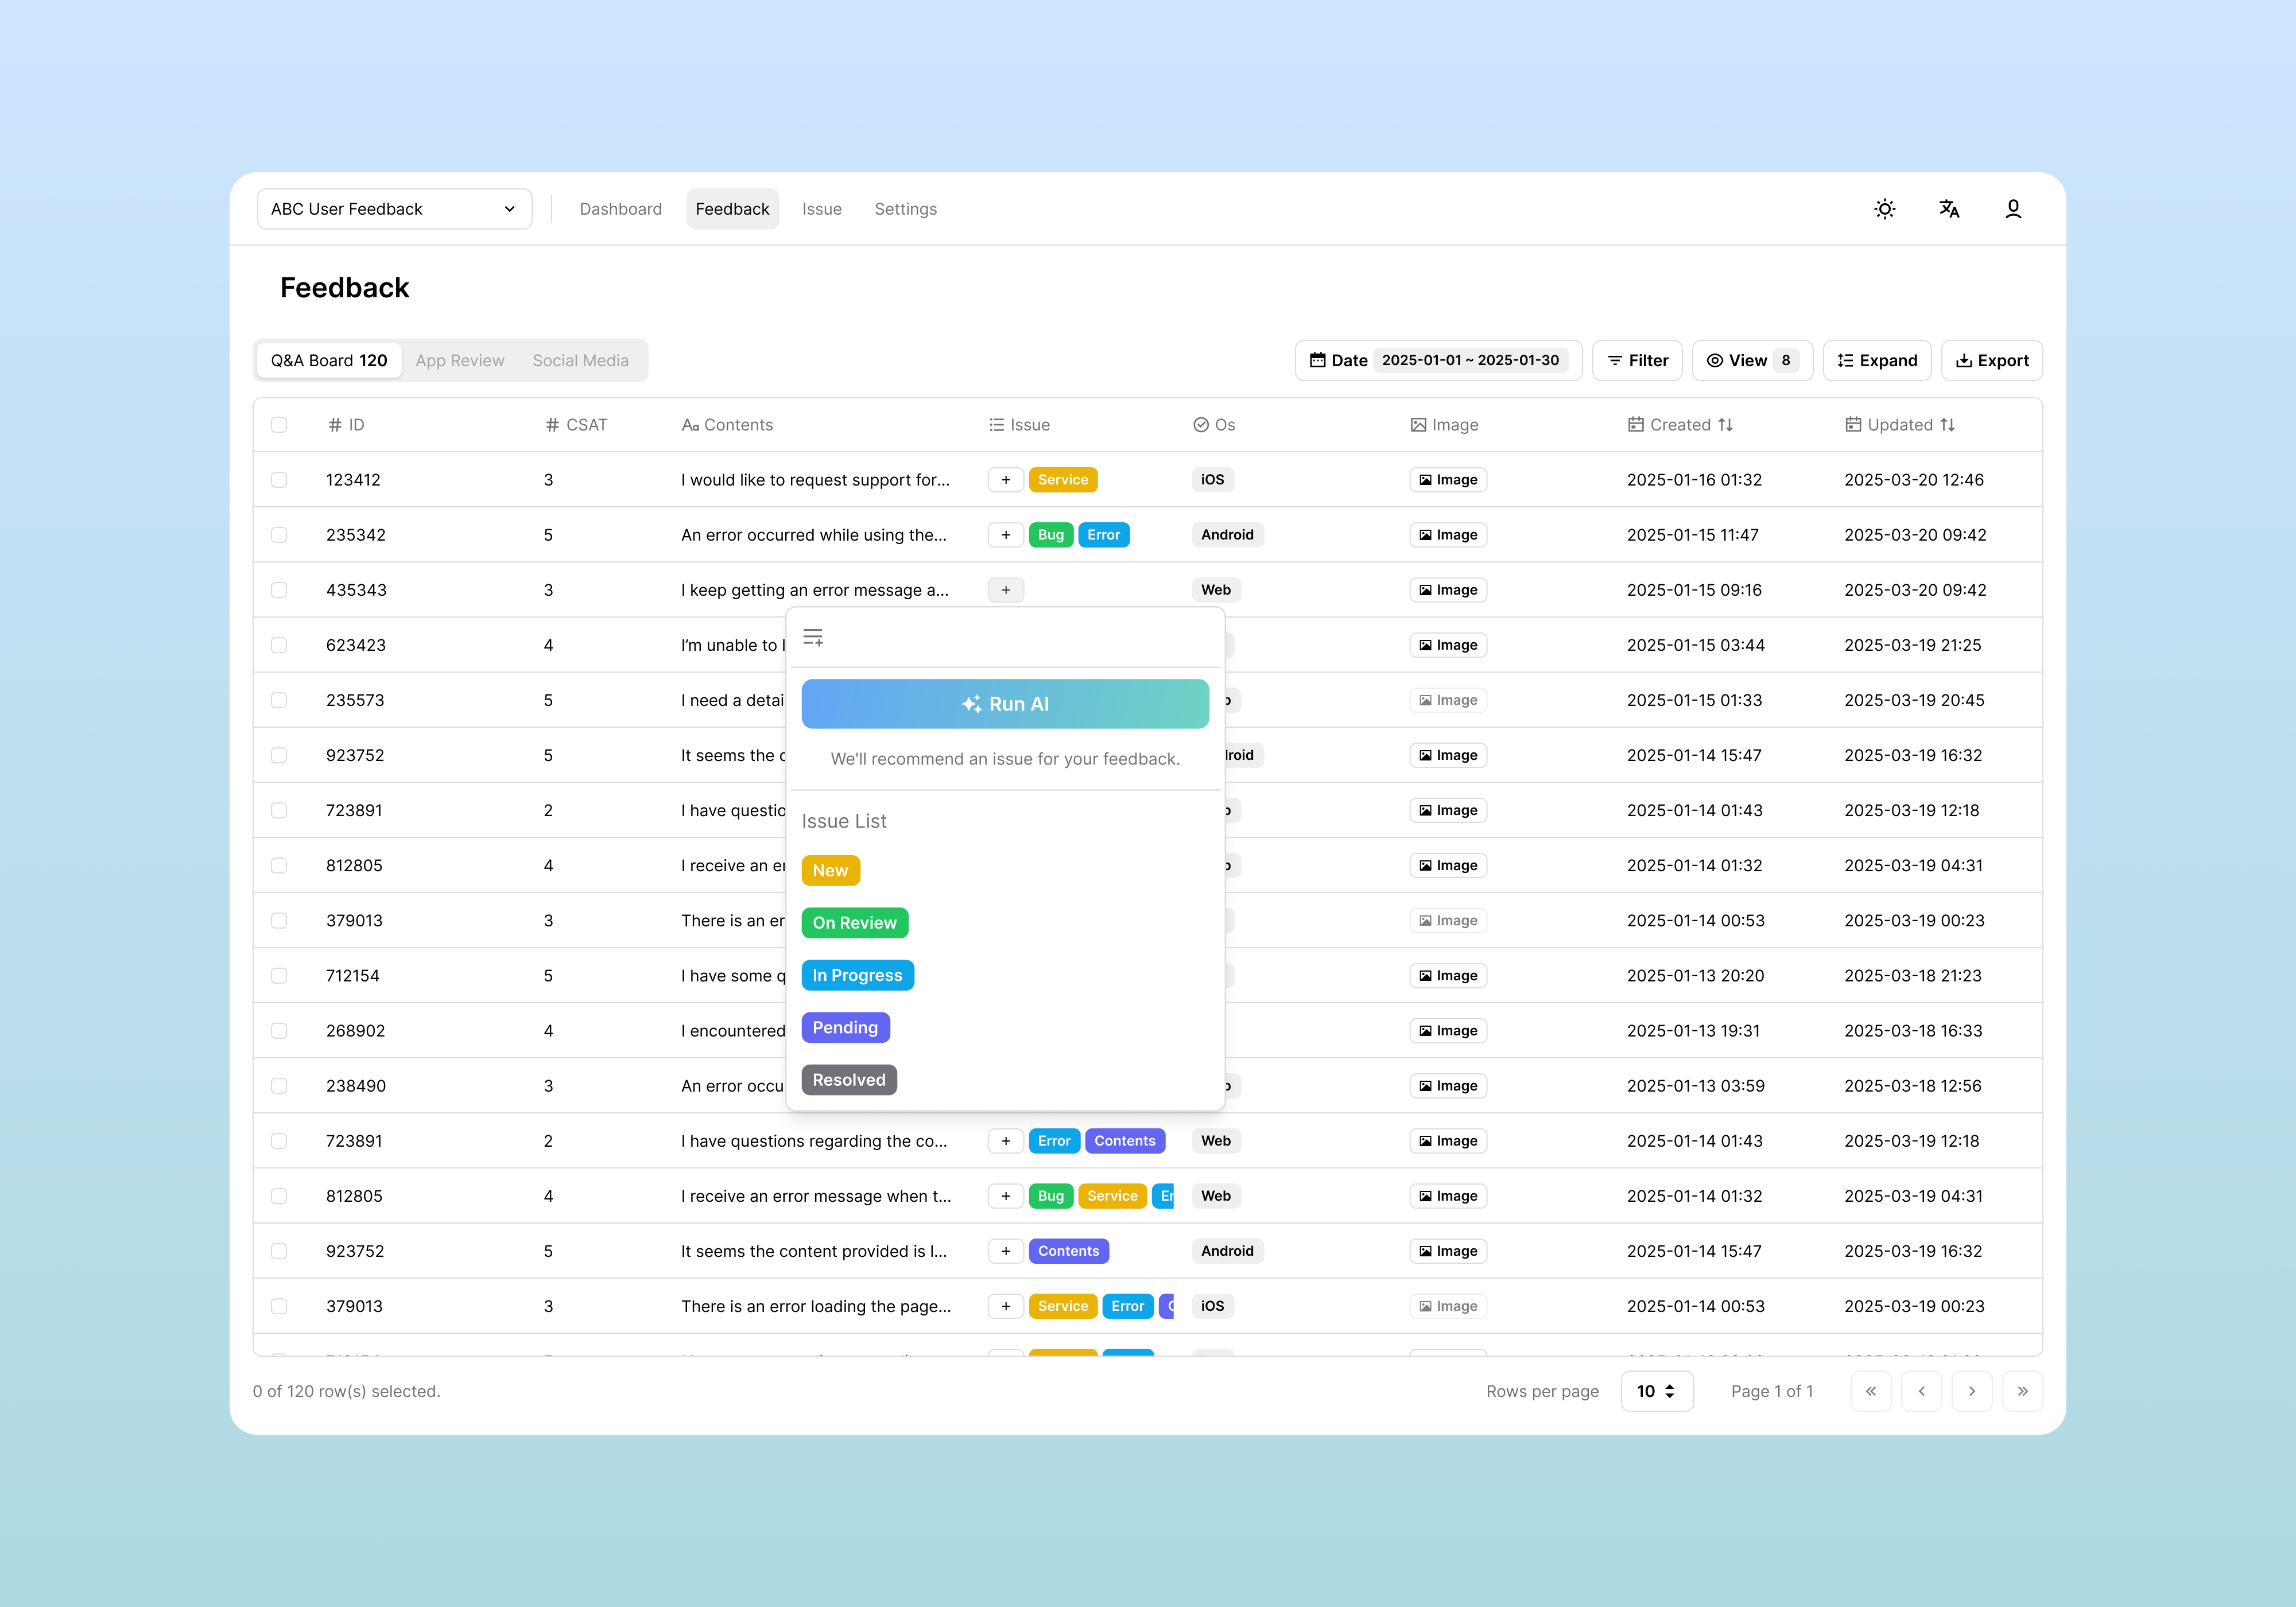
1. Create Issue from Feedback (Recommended)
The most common method, creating an issue based on specific feedback.
- Click feedback in the Feedback tab to open detail view
- Click the
+button in the Issue section of the right detail panel - Enter the issue name and press Enter or click the Create option
2. Create Directly from Issue List
- Click the Issue tab in the top menu
- Click the + Create Issue button at the top left
- Enter information in the issue creation dialog:
| Item | Description | Required | Example |
|---|---|---|---|
| Title | Issue title | Required | Login button malfunction |
| Description | Detailed description | Optional | Occurs in specific browser |
| Category | Issue classification | Optional | Bug |
| Status | Initial status (default: New) | Optional | New |
Editing Issues
You can modify information of created issues.
Editing Method
- Click the issue you want to edit in the issue list
- Click the Edit button in the Issue Details panel that opens on the right
- In edit mode, you can modify the following items:
Editable Items
| Item | Editable | Description |
|---|---|---|
| Title | ✅ Yes | Issue title |
| Description | ✅ Yes | Detailed description |
| Category | ✅ Yes | Issue classification (select from dropdown) |
| Status | ✅ Yes | Current progress status |
| Ticket | ✅ Yes | External issue tracker ticket number |
| ID | ❌ No | System auto-generated |
| Created | ❌ No | Creation date/time |
Save and Cancel
- Save button: Saves changes and exits edit mode
- Cancel button: Cancels changes and reverts to original state
External Issue Tracker Integration
When integration with external issue trackers (Jira, etc.) is configured, you can link external tickets to issues.
Ticket Linking Method
- Enter the external ticket number in the Ticket field in the issue detail panel
- The entered number is automatically converted to an external system link
Note: External issue tracker integration requires prior configuration in Settings > Issue Tracker Management.
Deleting Issues
You can delete issues that are no longer needed.
Deletion Method
-
Click the Delete button in the issue detail panel
-
Approve deletion in the confirmation dialog
Deletion Notes
- Cannot be recovered: Deleted issues cannot be restored
- Feedback links removed: Issue links in connected feedback are removed
- Statistics impact: Data is excluded from dashboard issue statistics
Kanban View
Kanban view is a viewing method that allows visual management by separating issues into columns by status.
Accessing Kanban View
- Click the Issue tab in the top menu
- Select Kanban view at the top right
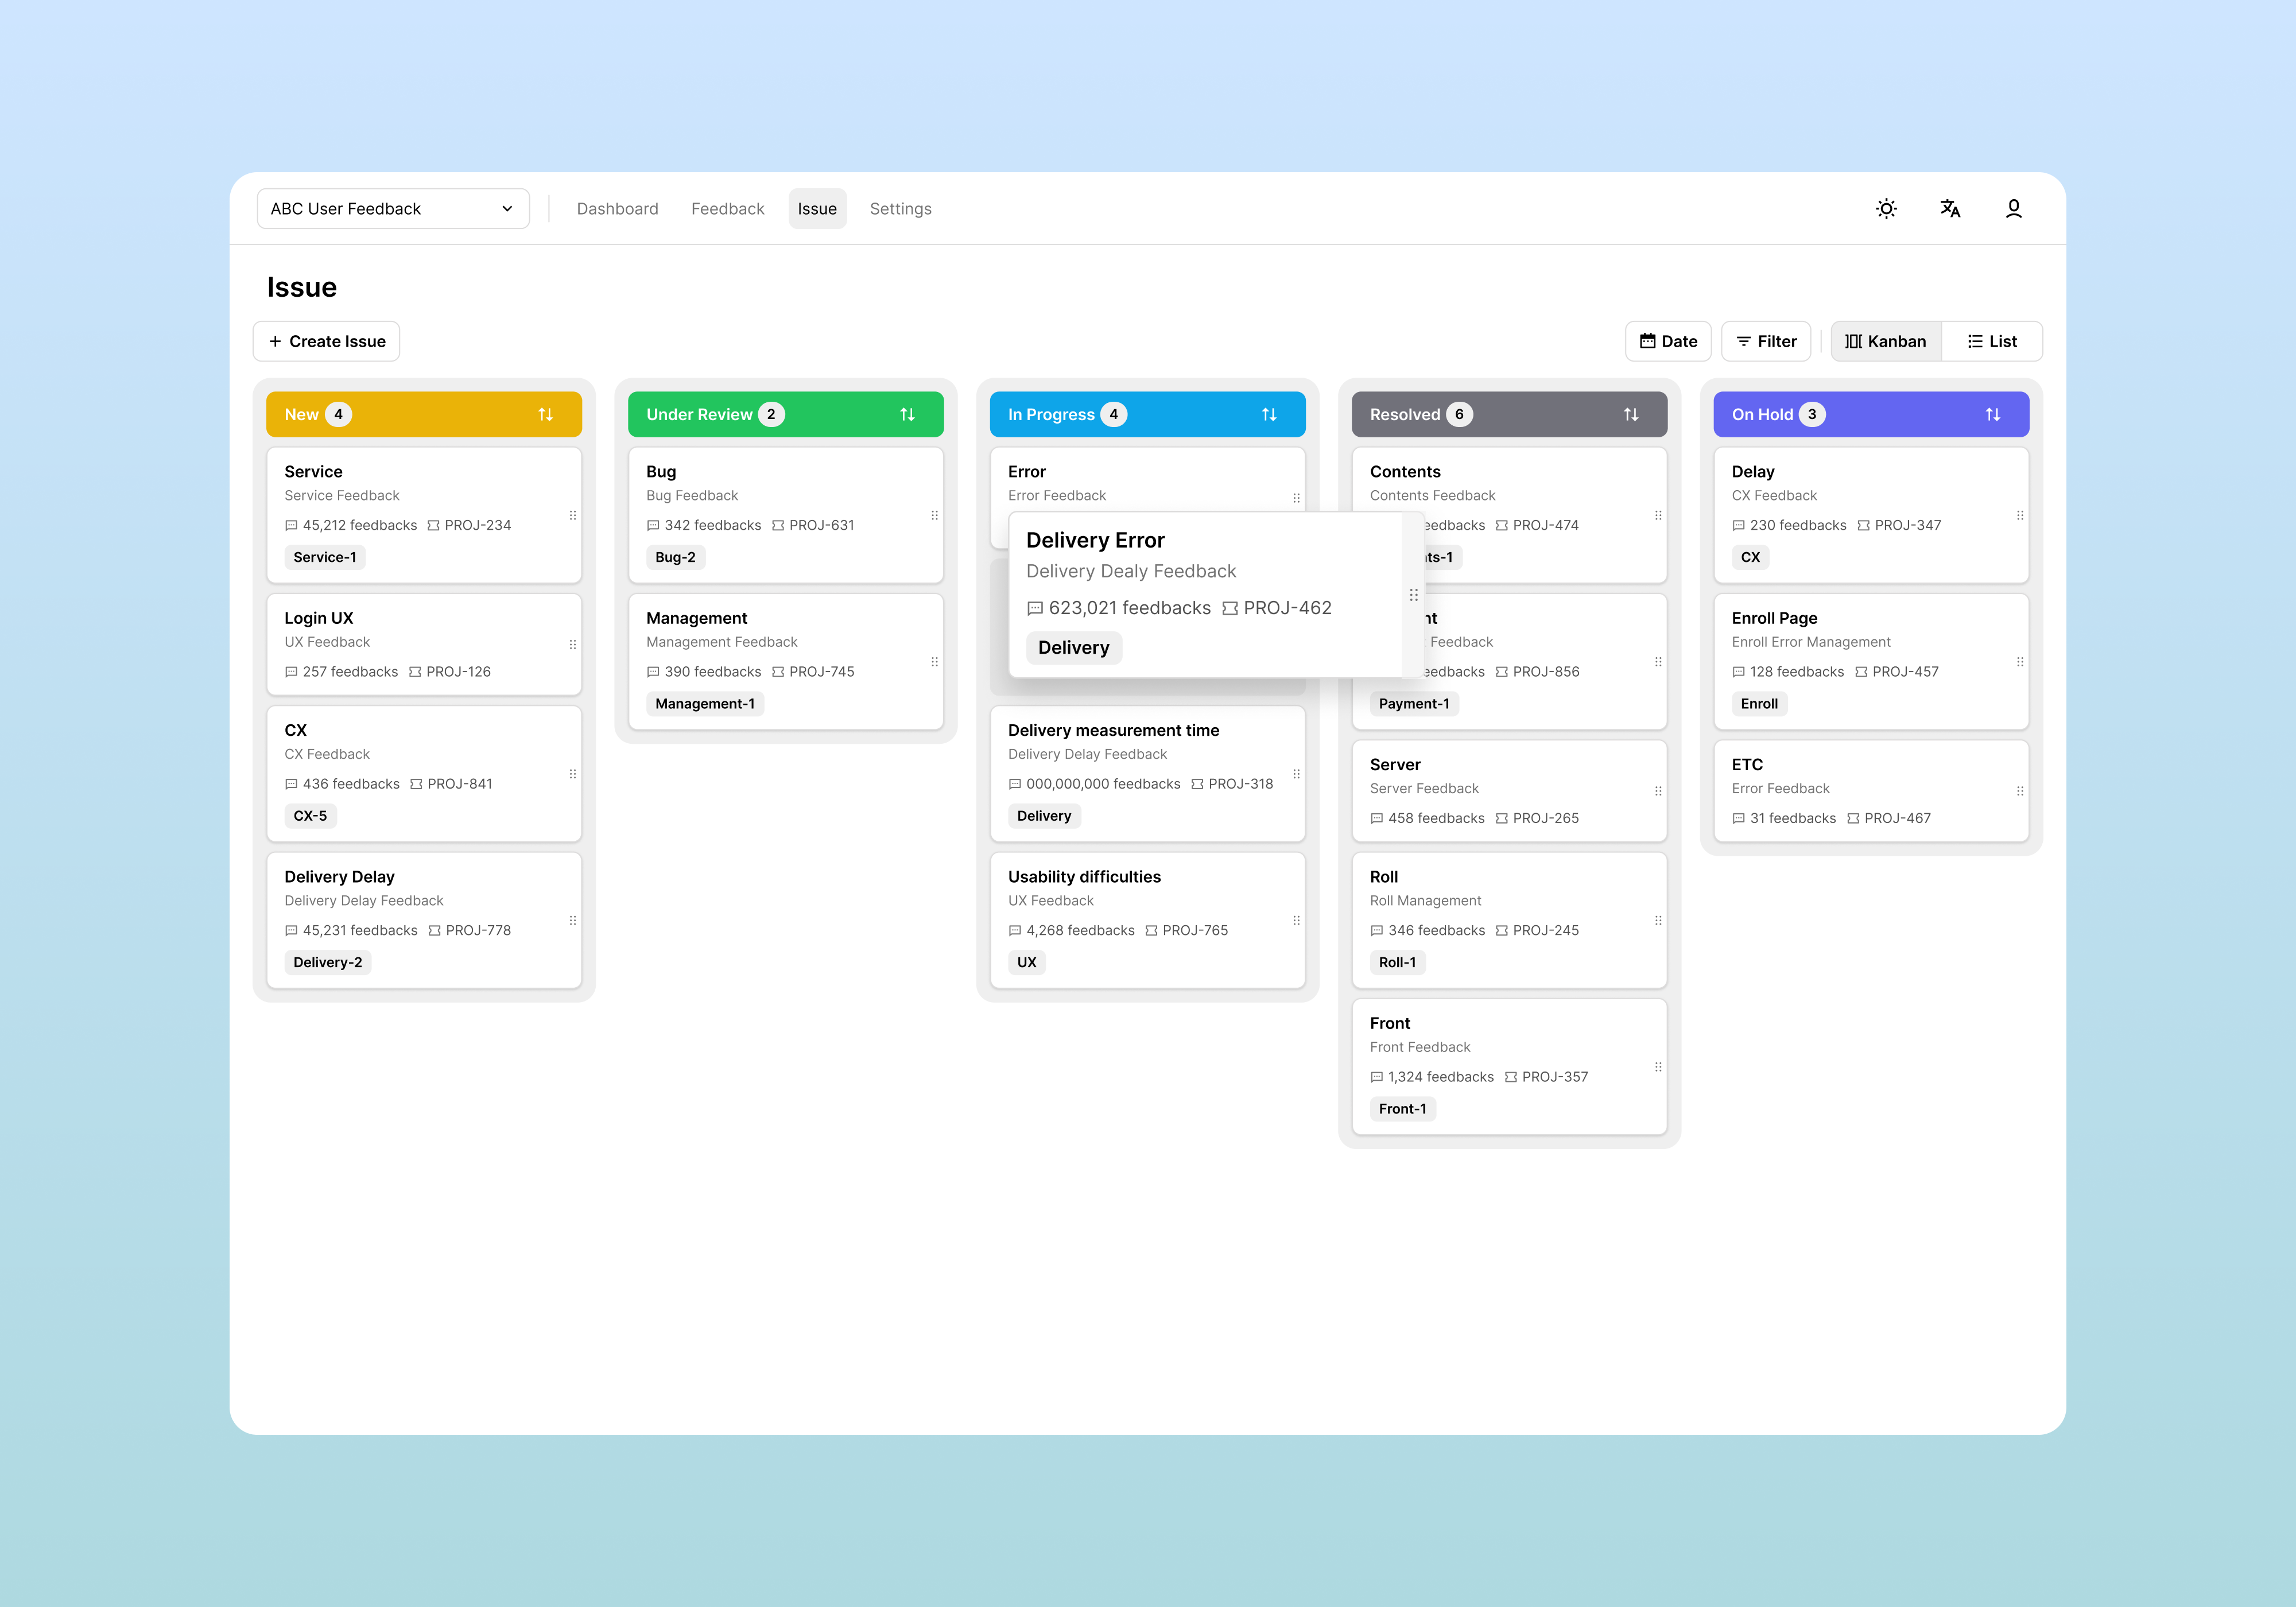
Kanban Board Structure
Columns are organized by each status, and issues are displayed as cards.
Kanban Column Structure
| Column | Display Information | Card Count Display |
|---|---|---|
| New | Newly registered issues | Number at top |
| On Review | Issues under review | Number at top |
| In Progress | Issues in progress | Number at top |
| Resolved | Resolved issues | Number at top |
| On Hold | Issues on hold | Number at top |
Issue Card Information
Each issue card displays the following information:
- Issue title: Click to go to detail view
- Feedback count: Number of linked feedback (with 📝 icon)
- Category: Displayed at bottom if set
- External ticket: Ticket number displayed if linked
Drag and Drop Status Change
A core feature of kanban view, you can change status by dragging issue cards to different columns.
Usage Method
- Click and drag an issue card with the mouse
- Move it over the desired status column
- Release the mouse to automatically change status
Kanban View Filtering
You can display only issues matching specific conditions using the filter function at the top.
Available Filters
- Date filter: Display only issues created in a specific period
- Filter button: Set advanced filter conditions
Filter Condition Examples
| Filter Type | Condition Example | Use Case |
|---|---|---|
| Category | Category = "Bug" | Check only bug issues |
| Title | Title contains "Login" | Find login-related issues |
| Created | Created >= 2024-03-01 | Issues created after specific date |
| Status | Status != "Resolved" | Display only unresolved issues |
Kanban View Sorting
You can change the sort order of issue cards within each column.
Sort Options
- Created Date ↓: Newest first
- Created Date ↑: Oldest first
- Feedback Count ↓: Most linked feedback first
List View
List view is a viewing method that displays issues grouped by category in table format.
Accessing List View
- Click the Issue tab in the top menu
- Select List view at the top right
List View Structure
Issues grouped by category are displayed hierarchically.
Category Groups
Each category is displayed as a collapsible/expandable group:
- Group header: Category name and number of included issues
- Collapse/Expand arrow: Toggle group content display/hide
- "No Category": Issues without assigned category
List View Filtering
Provides the same filter function as kanban view.
Filter Application Method
- Click the Date or Filter button at the top
- Set desired conditions
- Filtered results are displayed grouped by category
Empty Category Handling
Categories with no issues in the filtering results are automatically hidden.
List View Sorting
You can sort by clicking each column header.
Sort Behavior
- First click: Ascending sort ↑
- Second click: Descending sort ↓
Each Sort Content
| Sort Criteria | Use Case |
|---|---|
| Created ↓ | Check latest issues first |
| Feedback Count ↓ | Prioritize high-impact issues |
| Status | Check grouped by status |
Issue Categories
Issue categories are a feature that allows systematic management by classifying issues.
Purpose of Categories
- Issue classification: Distinguish bugs, feature requests, improvements, etc.
- Analysis ease: Analyze issue occurrence patterns by category
Default Category Examples
Commonly used category classifications:
| Category | Description | Priority | Example Team |
|---|---|---|---|
| Bug | Function malfunction, errors | High | Development Team |
| Feature Request | New feature addition requests | Medium | Planning Team |
| Improvement | Existing feature enhancement | Medium | UX Team |
| Performance | Speed, stability issues | High | Infrastructure Team |
| UI/UX | User interface problems | Low | Design Team |
| Documentation | Help, guide related | Low | Technical Documentation Team |
Category Management
Adding Categories
You can add new categories in the issue detail panel:
- Click the Add button in the Category field of the issue detail panel
- Enter the new category name
- Press Enter or click the confirm button
Assigning Categories
You can assign or change categories for existing issues:
- Click the Edit button in the issue detail panel
- Select the desired category from the Category dropdown
- Save changes with the Save button
Category-Based Issue Management
Checking by Category in List View
In list view, you can see issues grouped by category at a glance:
- Issue count by category: Number of included issues displayed in each group header
- Group collapse/expand: Selectively check only needed categories
- "No Category" group: Separate management of unclassified issues
Category-Based Filtering
When you want to check only issues of a specific category:
- Click the Filter button
- Add a Category condition
- Select the desired category
Related Documents
- Feedback Management - How to create and link issues from feedback
- Issue Tracker Integration - Integration settings with external tools
- Project Management - Team composition and permission management